Installing an Operating System
Introduction
Before a computer's hardware can truly be useful to a user an operating system has to be installed. In this case we are going to install the Parrot Security Linux Distribution on our Driver system.
Objectives
After this tutorial, you should be able to:
- Install Parrot Security
- Describe the various abstraction layers of the Linux Operating System
- Configure Parrot Security during installation
Pre-Requisites
Tutorials
Before starting this tutorial, you will need to set up the "Driver" Virtual Machine as in 00 - Configuring a Virtual Machine.
Requirements
Software
Before starting this tutorial make sure you have the following files:
- The Parrot Security ISO downloaded from the Homelab Tutorials page
Hardware
No changes to your hardware setup will be required as long as you have completed tutorial 00 - Configuring a Virtual Machine.
Discussion and Process
Operating Systems
Operating systems are the underlying programs that run on your computer and control all of the interactions that you have with the system. In fact, the operating system can be described as being separated into "User Space" which is where all of your user activities take place, and "Kernel Space" which is where the system manages interactions with hardware such as the system processor, RAM, Storage Devices, etc.
                 +--------------------------------------------------------------------------+
                 |User Space                                                                |
                 |                  Applications                                            |
                 |                  Input                                                   |
                 |                                                                          |
                 |                                                                          |
                 |                                                                          |
                 |                                                                          |
                 +--------------------------------------------------------------------------+
                                                       ^
                                                       |
                                                       v
                 +--------------------------------------------------------------------------+
                 |Intermediary                                                              |
                 |                   GlibC for Linux - Controls all interactions from user  |
                 |                   	space to kernel space.                              |
                 +--------------------------------------------------------------------------+
                                                       ^
                                                       |
                                                       v
                 +--------------------------------------------------------------------------+
                 |Kernel Space                                                              |
                 |                   Hardware Interactions                                  |
                 |                   Drivers                                                |
                 |                   Network Control                                        |
                 |                                                                          |
                 |                                                                          |
                 +--------------------------------------------------------------------------+
Between those two spaces is an intermediary library, in the case of Linux this is the GNU C Library (GlibC), that can be called when an application needs to interact with specific hardware.
At any given moment your operating system is doing a ton of things. It is keeping track of the temperature of your hardware to control fan speed, it is displaying the changes on your screen, it is managing the amount of memory being used by creating and destroying links, and it is keeping track of the way your storage is handling itself and determining if it needs to be defragged. Ultimately, however, the things we care that the operating system are doing is that the OS is giving us a framework of tools and interfaces that let us use the computer in a meaningful way.
Interfaces
In Linux we will be using two different classes of interfaces, Graphical and Command Line.
Graphical Interfaces
Graphical Interfaces are what most modern computer users are most familiar with. These interfaces are also known as "Graphical User Interfaces" (GUIs). They render windows for different applications, a mouse pointer, the text formatting we see on the screen, usually in full color. The GUI we will be using on Parrot, if you took my suggestion, will be managed by the "Mate" (mah-tay) window manager. This will show us all of the menus, clocks, etc. that we are familiar with. In fact, most of our Command Line interactions will even happen via a Terminal Emulator rendered by the GUI.
Command Line Interfaces
In Windows you may be familiar with PowerShell or the Command Prompt. These are similar in form to the Linux Command Line Interface (CLI). CLIs in Linux are a textual interface to a shell. The shell is a command parser for the operating system (in fact, GUIs are a graphical shell). In Linux anything that can be done in the GUI can also be achieved via the CLI. The most common CLI is a Terminal Emulator that will connect the user to a shell terminal. This connection allows the user to pass commands in text form directly to the operating system.
Basic Commands
Here is a table of some very basic commands to familiarize yourself with as we install the operating system. You will not need to know these until the next tutorial, and we will go over them in more detail then.
| Command | Function |
|---|---|
| ls | Lists the contents of the Current Directory |
| cd <Directory> | Changes Directory to the chosen directory |
| pwd | Prints the current working directory |
| whoami | Tells you what user you currently are logged in as |
Basic Package Management
With Parrot Linux being in the Debian Linux family, we will need to become familiar with the APT package manager. APT is a front-end manager for the dpkg (Debian Package) manger. APT will allow us to install new applications, update our current system, and review or uninstall installed applications. APT uses a common command syntax:
apt <subcommand> <Options>
Some common subcommands and their options are in the table below:
| SubCommand | Function |
|---|---|
| search <search term> | Search configured Repositories for a given package |
| install <package name> | Installs the requested package if it is available in the Repositories |
| update | Updates the local caches of remote repositories |
| upgrade | Updates installed packages on the system to their latest versions |
Installation
Preparing the Installation Media
To install the Parrot Operating System onto our virtual machine we will need to prepare our install media and attach it to the virtual machine. This will require us to open the Virtualbox Software.
- Select the "Settings" of the "Driver" virtual machine

- Select the "Storage" option from the left hand menu

- In this window we will need to add a disc to the drive

- This will bring up the disc selection window, here we will add a disc to the library

- Add the Parrot ISO to the library
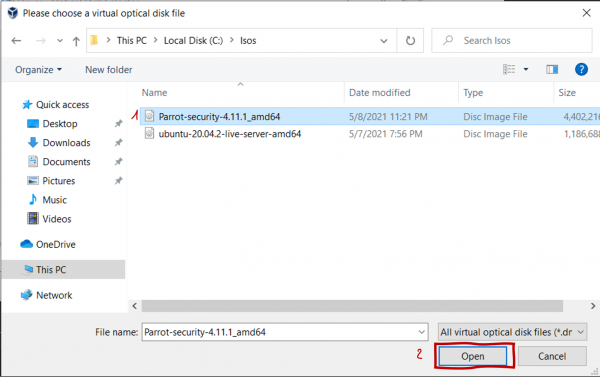
- When returned to the disc selection window, select the Parrot ISO and press "choose"

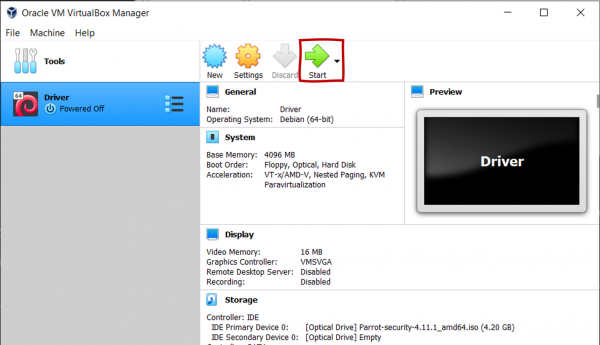
- In the "Settings" window, verify that Parrot is now an inserted disc and press "ok"


At this point we have prepared the installation media and are ready to install Parrot Security to our VM. In the above series of events, we prepared to install the operating system by preparing the installation media (in this case an ISO disc image, which is effectively the contents of a CD-ROM, DVD, or Blu-Ray disc bundled into a file) into the virtual disc drive of the virtual machine. This will allow the system to boot to this disc image in much the same way a physical machine boots to a disc or USB when directed.
Installing the Operating System
Once we have the installation media attached to the machine, we simply need to turn the VM on. In Virtualbox, new VMs are set to boot to any attached virtual disc images before any virtual hard drives. During this process, please be sure you can see the Virtualbox window around the computer. DO NOT RUN THIS ON YOUR HOST SYSTEM IN THIS MANNER.
- In Virtualbox, start the "Driver" VM
- Allow the system to automatically boot into the "live mode"

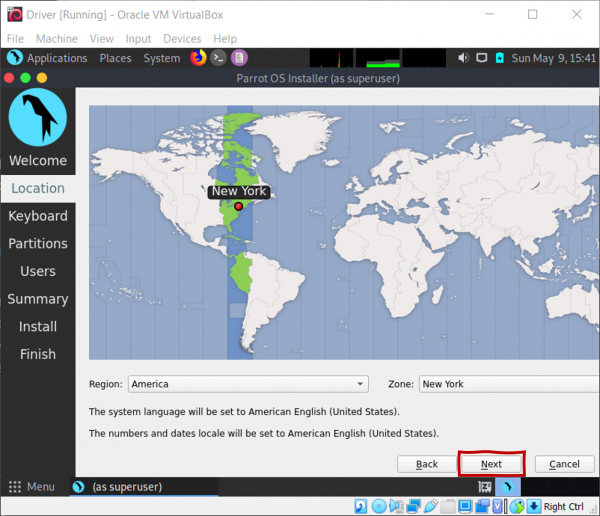
- Open the "Install Parrot" application on the Desktop

- In the Installer, keep the defaults and press "Next"

- This will bring you to the location selector. I kept the defaults. press "Next"
- Select your keyboard layout. I kept the defaults. press "Next"

- On the Disk Configuration screen we will prepare our hard disk. In this case we will want to select the "erase" option, leaving the automatic defaults. Once that is selected press "Next"

- Now we have to configure the first user. In this case I have given myself the name 'Daelphinux' (1), the username 'daelphinux' (2), the machine name 'homelab-driver' (3), and a password set to 'hunter2' (4), then press "Next"

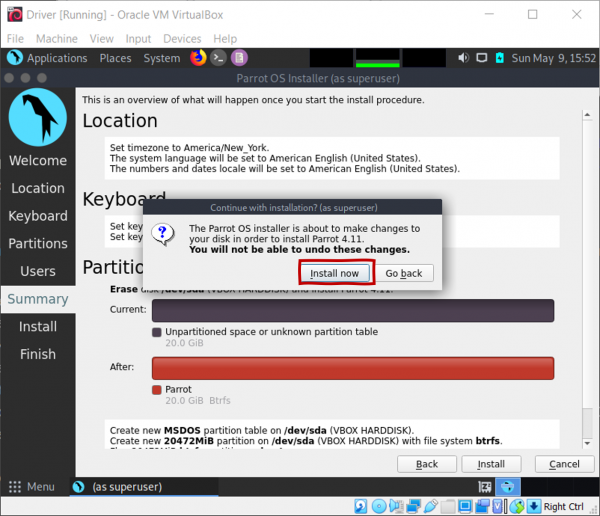
- On the summary screen, review everything to make sure it makes sense, and then press "Install"

- On the popup warning press "Install Now"
- Wait for the progress bar, get some coffee, make some pizza rolls, watch a [youtube video]...

- Select "Done" and reboot the system. The installer will instruct you to remove the media and press "Enter" to continue.


Once the system reboots and prompts you to log in, you should be ready to go. At this point you can log in to your new Parrot Security system, although I would caution you not to use any tool you do not understand. So at least read the docs.
Next Steps
Our next steps are going to be a primer on using a Linux system, and installing an Infrastructure server that will let us have basic internal network management tools such as DHCP.
Optional Self-Study Questions
- What is the primary function of an Operating System?
- What 2 interfaces did we learn about in this tutorial? How are they different? How are they the same?